DIY Makeup Brush Roll-Up

I’ve been wanting to make my own makeup brush roll, but wasn’t able to find fabric that I loved. Then thanks to Pinterest (as usual), I saw that people were making roll-ups for their makeup brushes using placemats…YES! Genius, the edges are already finished and the place mats typically have some type of structure to them. So off to Pier1 Imports I headed to find a fun placemat, and goodness they had quite the selection. It was hard for me to decide, but I went with my faves teal and coral. This is a super easy project and took me about 30-45 minutes to make from start to finish. Enjoy!

makeuproll_finished collage

MATERIALS

  • Standard placemat
  • Coordinating thread
  • 1/2 yard coordinating ribbon
  • Makeup brushes

INSTRUCTIONS

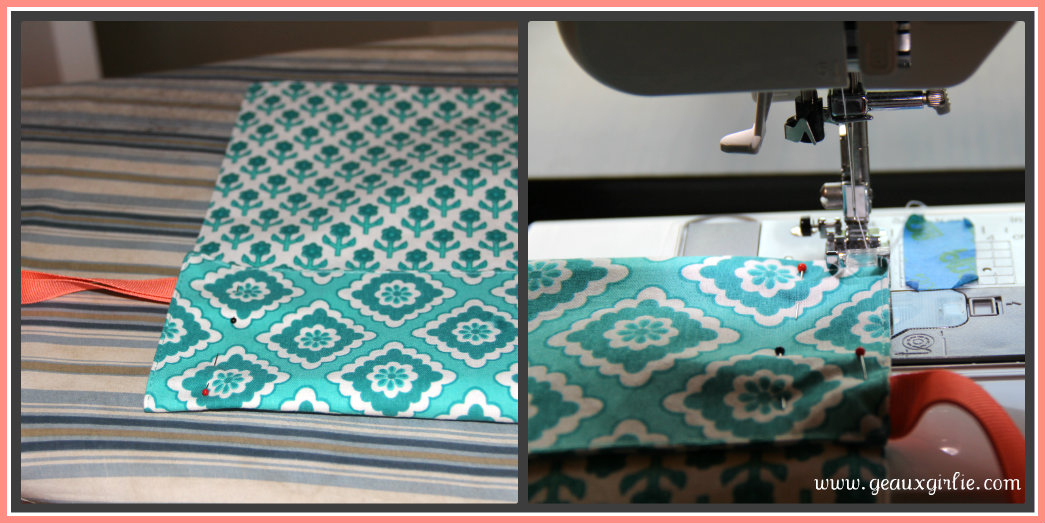
  • With the right side of the fabric laying face down, fold up three inches from the bottom and pin.
  • Fold your ribbon in half and tuck the folded edge into the left side of the folded up placemat.
  • Sew the left and ride side of your placemat along the edge to create a “pocket”.

makeuproll_pincollage

  • Next lay out your makeup brushes on top of your fabric to decide how many pockets you’ll need. Then measure your pockets, making sure to leave a bit of room on each side for seam allowance, so that the brushes will slide in/out easily. I used 3, 2 and 1 inch pockets.

makeuproll_slotscollage

  • Sew a straight line where you’ve pinned each pocket from the opening of your fold down to the crease .
  • The final step is to roll your brushes up, tie the ribbon in a bow, decide the appropriate length of your ribbon, and snip of the remaining ribbon “tails”.

Good luck! I hope you enjoy this quick and easy project as much as I did. Let me know if you have any questions about the project.

DIY Red, White & Blue Dress

Happy 4th of July, y’all! In the spirit of Independence Day, I thought I’d share with y’all a little DIY post on making your own red, white & blue dress. I was inspired by this dress that I saw on Pinterest. After I made this maxi dress, I figured I could make this red, white and blue dress, but with a shorter skirt … so I did. And well, if you don’t want to be all decked out like an American flag then you could really make this dress using any color and pattern combination of your choosing.

Here’s a little preview pic of the final product …

IMG_0414_2

MATERIALS 

IMG_0371

  • Favorite tank top :: 1 inexpensive tank top. Keep in mind that you’ll only use the top portion of the tank top so what it looks like on the bottom and the length doesn’t really matter. I purchased this one from Old Navy for under $8.
  • Fabric :: Enough fabric to wrap around yourself twice about 2-3 yards. I used a cotton fabric from JoAnn’s.
  • Elastic ::  2 inch wide white elastic
  • Thread :: Thread to match the fabric for our dress. You don’t need coordinating thread for your tank top.
  • Additional Materials :: Safety pins, straight pins, large/extra large safety pins, scissors, measuring tape, iron and sewing machine

INSTRUCTIONS

  • Wash your tank and fabric :: It’s always best to wash and dry your fabric before you start any project.
  • Cut your tank top :: Try on your tank top, mark a line and add about 1/2-1 inch below for seam allowance. Take off the tank top and cut along this line. For the maxi look, I marked my cut line just above my belly button.

IMG_0377

  • Cut the skirt :: Wrap the fabric for the skirt 1 and a 1/2 times around your waist where you want the skirt part of your dress to start.  Cut off the remaining fabric.

IMG_0380

  • Sewing the skirt :: Fold the skirt fabric in half with right sides facing each other, pin the edges and sew up the long side. Once complete, you’ll be left with a big “tube”.

IMG_0387

  • Creating a waistband :: With the fabric still with the right sides still facing each other, fold down the top edge of the skirt about 3 inches and pin along the way to create a tunnel for the elastic.  Be sure that you leave about a 2-3 inch opening where you don’t pin so that you can work your elastic through the waistband after sewing. Now sew along the edge of your fold to create the tunnel all the way around your skirt. Remember again to leave a 2-3 inch opening that you don’t sew at this point.

IMG_0390

  • Cinching it up :: Place the large safety pin on one end of your elastic. Slowly begin to weave the safety pin into the tunnel you created at the top of your skirt. Keep in mind that you don’t want to lose your elastic inside the tunnel, so be sure to hold on to the end of your elastic as you make your way around your skirt. Once you’ve got the elastic through the entire tunnel, use safety pins to hold the elastic in place on at both openings. Now, turn the skirt right sides out and put the skirt on, and hold up to where you want it to start. Remove one of the safety pins and begin gently pulling the elastic to cinch the waistline to your designed fit. Note that you’ll need to make sure you leave enough room to get the skirt on and off over your head. Once you have your desired waistline created, pin the two sides of elastic together with a safety pin and take the skirt off. Turn the fabric so that the right sides are facing inward. Sew the elastic together at the point where you pinned and then cut any of the remaining elastic. Now you’ll want to sew close the entryway you left open to feed your elastic through.

IMG_0392

  • Adding the tank top :: Now you are ready to add your tank top to the skirt. With your skirt fabric still facing wrong sides out, slide your tank top in to the top hole of your skirt. Make sure your tank top is right sides out, and slide in so that the straps go in first. Line up the back of the tank top with the long side seam of your skirt. In other words, the long side seam that you created will be running down the back of your dress. Using your straight pins, begin to pin the cut edge of your tank top to your skirt just at the top of the waistband you created with the elastic. Start pinning at the back seam and back of your tank top, divide skirt edge and tank top edge into four equal parts, and pin to get equal distribution of gathers and for ease of sewing. Then sew the bottom of your tank top and top of your skirt (where you just pinned).
IMG_0394 IMG_0395 IMG_0396
  • Ready to hem :: You are so close to being finished! Now you’ll want to turn your dress right sides out and try it on. With the help of another person, hem your dress to the desired length using straight pins. Take off your dress, turn your fabric wrong sides together and sew your hemline. Trim any excess fabric.

IMG_0391

AND YOU’RE DONE!  One thing to note, hang your dress by folding it over a hanger instead of hanging by the straps, which will cause the tank top to stretch.

Here’s another pic of the dress in action at a Washington Nationals baseball game. That’s me, Teddy and my FSIL! You see, this dress can be worn other than on July 4th and still look cute. 

natswithmad

Do you think y’all will try and make little number? If so, let me know if you have questions or comments!

Lightly Lemon Squares

I like to call these delicious treats lightly lemon squares. I found the recipe on this blog, via Pinterest. They have an amazingly, creamy texture with just the right amount to tart and sweetness to them. The graham cracker really helps to balance out the lemons, leaving you with a wonderful sweet treat. I made this for the first time on Easter, and have since made them for several small group and parties. Give them a try, they are delicious and super easy to make. I used reduced fat graham crackers and fat free condensed milk to lighten up the recipe a bit, and they were still very good! Enjoy!

*Note I didn’t take step-by-step pictures, so please message or email me if you have any questions.

lightlylemonsquaresIngredients

  • 1 can Eagle Condensed Milk
  • 1 box of Graham Crackers
  • 1/2 cup of Lemon Juice (fresh or bottled)
  • 1 tsp grated Lemon Rind
  • 1/4 cup Unsalted Butter, softened
  • 2-3 cup Powdered Sugar
  • 1-2 tsp Lemon Juice (fresh or bottled)
  • 1-2 tsp Milk
  • Yellow Food Coloring

Lemon Square Preparation

  1. In a bowl, stir together condensed milk, lemon juice and lemon rind until well mixed and thick.
  2. Layer the bottom of a 9x9pan with graham crackers.
  3. Pour a layer of the lemon milk mixture over the graham crackers and use a spatula to spread evenly.
  4. Continue to layer the graham cracker and lemon mixture another 3-4 times so that you have at least 4-5 total layers, ending with the top layer as graham crackers.
  5. Place in the refrigerator for about 30 minutes to 1 hour.

Lemon Icing Preparation

  1. Cream butter and about 1 cup of powdered sugar until well mixed.
  2. Gradually add in lemon juice to taste.
  3. Combine the remaining 2-3 cups of powdered sugar until the consistency is thick, but spreadable. If your icing becomes too thick, add small amounts of milk until the desired consistency is achieved.
  4. Add a few drops of yellow food coloring and milk well.
  5. Remove the lemon squares from the refrigerator and frost the top using your lemon icing.
  6. Return to the fridge. Bring the lemon squares to just slightly at room temperature before serving.

Oh, How Pinteresting!

Oh my love for Pinterest is back in full swing. It’s become my nightly ritual to browse before I go to bed. Even better news, my sister is FINALLY on Pinterest! This my friends is a blessing because I quite often was sending her links via text or email of things I saw that she’d like. After much nagging she created an account…yippee!

So, I’m linking up with The Vintage Apple for “Oh, How Pinteresting!” to share with y’all some of my faves from the past few days.

cupcakedecorPinterest via

mardigrascupcakes

Pinterest via

pumpkinpancakes

Pinterest via

painteddresser

Pinterest via

brickwall

Pinterest via

Grab and button & link up with The Vintage Apple for
“Oh, How Pinteresting Wednesday”!

Our Journey – Faith and Timing

Happy MLK and inauguration day, lovelies! There has been a lot of thinking that has gone into this post. A lot of typing, deleting, retyping, deleting, typing, you get the picture. But today a quote from Dr. Martin Luther King struck me and so here I sit again trying to put into words what I’ve wanted to say for so long…to start finish this post.

MLKquote

For two years, we’ve been trying to conceive our first child – unsuccessfully. Turns out that I am one of the 6,000,000 women out there that are considered to have fertility issues. Our faith is in the Lord and we have taken several the first steps towards trying to have a family – without seeing the entire staircase, without knowing His plan for us. And we’re okay with that. We cling to His promises and we will continue to move forward and are hopeful that in His timing, we will have a family of our own.

“Consider it pure joy, my brothers and sisters, whenever you face trials of many kinds, because you know that the testing of your faith produces perseverance “ James 1:2-3

For now, we’ve taken a huge leap of faith when I recently gave my resignation at my full-time job. We felt that at this point in our journey towards starting a family this was the next step He was calling us to take. It’s a scary thought, but we feel His presence and hand guiding us. The next step in our journey we are uncertain of what that will look like, but we are confident when the time comes to make that decision He will have prepared us. If I’m being honest, this uncertainty has caused us to spend more time on our knees praying.

“Let your hope make you glad. Be patient in time of trouble and never stop praying” – Romans 12:12

So thanks for letting me share this part of our journey with y’all. We are blessed beyond measure, patient and faithful.

james

2012 Year in Review

With just a few short hours before we ring in yet another year, I guess it’s time for the obligatory year in review post. If I’m being honest, I’m ready for a new year, with new joys; 2012 has been tough to say the least. But out of the pain, sorrow and hard times I’ve been able to see the blessing from the Lord. Through this year I’ve learned that I need to spend more time on my knees in prayer and less time talking, trying to control and solve the problems. Give it to God.

20121231-161404.jpg

A few highlights from 2012:

  • My beloved LSU Tigers went to the BCS National Championship game
  • Visited our good friends and their adorable baby in Houston
  • Surprise visit for a weekend getaway to Disney World with my awesome sister and her family
  • Started our master bathroom remodel
  • Great week at the beach for the annual family J.A.M. Fest
  • Bought a new car
  • Got braces
  • Started a quarter-time job working at Chick-fil-A as part of their Marketing team
  • Worked some pretty incredible weddings and events
  • Got a pretty cool new sewing machine
  • Celebrated my 100th blog post
  • Made my first two maxi dresses
  • My team the Washington Redskins finally are NFC East Champs after being the division doormat for over a decade

Have a safe and happy evening! Cheers to 2012 and the new blessings to come in 2013. See y’all next year!

What’s Your Elf Name?

Hello! It’s Christmas Eve, can you believe it?! Only one more sleep until it’s Christmas Day! I can’t wait.

Do you know your Elf name? Well you should as well as the names of those you’re celebrating the holiday with. Using the first letter of your first name and your birthday month, match the words to determine your Elf name. This cracks me up every single time.

elf names

In our house today we have Perky Pointy-Toes, Twinkle Sugar-Socks, Sunny Sparkley-Toes and Elvis Sparkley-Toes working hard for Santa to prepare for his visit. My favorite elf (hubs) who is working today is Puddin McJingles…classic. Merry Christmas everyone!

Love,
Perky Pointy-Toes

High Five For Friday

Hello! It’s been a pretty great week! I celebrated my birthday, finished my Christmas shopping and am getting ready to celebrate the Christmas holiday with family and friends. I’m linking up with Lauren @ From My Grey Desk for High Five For Friday to share pictures from my week. I hope you had a great week too!

ONE

photo 1

TWO

photo 2

THREE

photo 4

FOUR

photo 3

FIVE

photo 5

  1. Holiday nails in Essie Fishnet Stockings (red) and Beyond Cozy (silver). That’s Macy waiting impatiently for my nails to dry so that I can take her outside. She has impeccable timing. 
  2. My office mate for the day. I moved her bed next to the space heater and I, and she snuggled up for the day while I worked.
  3. I turned 30-ish! Okay, 33 to be exact. I made these tasty Mexican Hot Chocolate Cupcake Crowns to celebrate!
  4. Josh surprised me at work for our hot chocolate bar event and he stayed to hang out and play Gestures with us. Fun!
  5. Celebratory birthday sushi!


Bathroom Remodel Update – The Needle is Moving

You aren’t done with that, you ask? Nope. When we first started the master bathroom remodel, I asked my neighbor-friend how long it took her hubby to complete their remodel. Her response [insert super, sweet southern accent] “A season.” HA! I laughed, surely we can get this done in a season…er, seasons.

In our defense, the hubs has been hard at work on the bathroom…when he’s not working his full-time job, saving lives, cats and other things, studying for promotional exams and working overtime. Or going on vacation, afternoons at the gun show or shooting range. I am not a complete slave driver, and I’ve gotta give him a little break here and there. Honestly, the length of time to get this bathroom complete hasn’t really phased me because we have another bathroom to use. Plus, I kinda like the dust that it creates in our bedroom, makes it easier to leave sweet notes to my honey…written iin dust. How romantic!

Some of you have asked, “How’s the bathroom coming along” and I figured that it was time that I gave you an update. I would say we are about 80% done with the bathroom. So here’s a look at what we’ve done so far.

window

Dad and DIY Master J framed out the window in our bathroom. I’m in love with this and now want to frame out all of the windows in our house. I’d like to say that a window without a frame is like a cupcake without icing…or something poetic like that.

shower

Only a few more tiles left and the shower will be complete. The hot guy working on my tile says that it’ll be done on this week. Then we call in the shower door man to install the beautiful frameless shower doors. The shower door man is different from the hot guy working on the tile. He (shower door man) pales in comparison, just sayin’.

tub

Doesn’t everyone keep their toilet in the bathtub? This picture shows the tub wall tile. The genius tile man made it so that the decorative tile is the same height as the decorative tile on the shower wall. This wall still needs a few pieces of finishing tile, a.k.a. bull nose, which I don’t get because it doesn’t look like a bull, nose or the nose of a bull.

floor

Not a great shot, but this is the floor tile. Is there anything else to say about this, I don’t think so.

PS – Sorry, honey for all of the references to you using everything but your name! Y’all see, he thinks it’s lame that I don’t refer to him by his actual name on this here blog. I think it’s funny that he thinks it’s lame so, when in doubt I like to call him by anything but his name, to make him smile roll his eyes.